
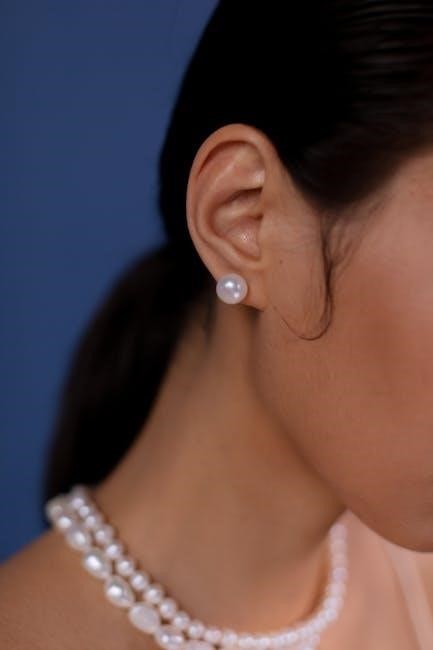
Ear stretching, or ear gauging, is a popular body modification involving enlarging ear piercings. It typically starts at 18g, with gradual size increases using tapers or plugs, requiring patience and proper aftercare to avoid complications like blowouts or infections. This guide provides essential tips, size charts, and safety advice for achieving your desired stretched ear size successfully and stylishly.
1.1 What is Ear Stretching?
Ear stretching, also known as ear gauging, is a body modification process where an ear piercing is gradually enlarged to accommodate larger jewelry. It involves using tools like tapers or plugs to increase the piercing’s diameter. Starting from standard sizes like 18g, the process requires patience and proper aftercare to ensure safety and avoid complications. The goal is to achieve a desired aesthetic, with sizes ranging from subtle enlargements to more dramatic gauges, depending on personal preference and lifestyle.
1.2 Brief History of Ear Stretching
Ear stretching has ancient roots, practiced by various cultures worldwide. Tribes in Africa and Asia adorned their ears with large plugs as symbols of status, spirituality, and beauty. In the West, it gained popularity in the 1990s as part of the body modification movement. Today, it’s a global fashion trend, with modern techniques and materials making it safer and more accessible. This historical evolution highlights its cultural significance and enduring appeal, blending tradition with contemporary style.
1.3 Why People Choose to Stretch Their Ears
People choose ear stretching for self-expression, cultural ties, or personal style. It allows individuals to showcase their uniqueness and confidence. Many find it empowering, as it reflects their identity or spiritual beliefs. Others appreciate the artistic appeal of various plug designs. The process itself can be meditative, fostering patience and discipline. Whether for aesthetic reasons or personal growth, ear stretching has become a meaningful way to embrace individuality and connect with like-minded communities worldwide.

Understanding Earlobe Anatomy
The earlobe consists of soft tissue, including skin, collagen, and minimal cartilage. Its elasticity and thickness determine stretching capacity, making it essential to understand before modifying.
2.1 Structure of the Earlobe
The earlobe is primarily composed of soft, flexible skin and a network of collagen fibers, with minimal cartilage. This structure allows for stretching, but its elasticity varies among individuals. The thickness and health of the skin play a significant role in determining how well the earlobe can accommodate larger gauges. Proper care and gradual stretching help maintain the integrity of the tissue, ensuring a safe and successful modification.
2.2 How the Skin Stretches
Ear stretching involves gradually enlarging the piercing using tapers or plugs, which encourage the skin to expand. The skin’s collagen fibers stretch and realign, creating a larger hole. Proper aftercare, including cleaning and using natural oils like jojoba, supports the process. Skin elasticity varies, and while some can accommodate large gauges, others may face limitations. Stretching too quickly risks tearing, so patience and gradual progression are essential for safe, successful modification.
2.3 Factors Affecting Stretching Capacity
Several factors influence how much the ear can stretch, including genetics, skin elasticity, and age. Younger individuals tend to have more flexible tissue, while older skin may be less accommodating. The thickness of the earlobe and natural collagen structure also play roles. Starting with a smaller gauge and progressing gradually helps determine individual limits. Overstretching risks permanent damage, so understanding personal capacity and pacing the process is crucial for safe, successful stretching.

Choosing the Right Size
Selecting the correct size for ear stretching involves understanding gauges, starting from standard piercing sizes like 14g or 18g, and gradually increasing to desired larger sizes, ensuring proper fit and comfort while avoiding overstretching risks.
3.1 Standard Ear Piercing Sizes (14g to 18g)
Standard ear piercings typically range from 14g to 18g, with 18g being the most common size for initial piercings. This range serves as the foundation for further stretching, allowing gradual progression to larger gauges. Understanding these sizes is crucial for safely starting your stretching journey and ensuring compatibility with various jewelry options. Proper measurement and selection of initial sizes prevent discomfort and potential complications during the stretching process.
3.2 Gauges and Millimeter Conversions
Gauges are standardized measurements for ear stretching, with smaller numbers representing larger diameters. For example, 14g is approximately 1.6mm, 16g is 1.2mm, and 18g is 1mm. Understanding gauge-to-millimeter conversions is essential for selecting the right jewelry and planning your stretching journey. This system ensures compatibility and helps you progress safely from smaller to larger sizes, avoiding mismatches and potential discomfort. Proper sizing is crucial for maintaining healthy, evenly stretched ears.
3.4 How to Measure Your Current Size
To measure your current ear piercing size, use a caliper or a ruler to gauge the diameter of your existing jewelry. Clean the tool and your ear thoroughly before measuring. If using a plug, measure the width of the wearable area. For accuracy, compare your size to a gauge chart or use a plug of known size. This helps determine your starting point and ensures you choose the correct tools for safe stretching. Avoid guessing to prevent improper sizing and potential discomfort.
The Stretching Process
Ear stretching involves gradually enlarging your piercing using tapers or plugs. Start with your current size, then slowly increase to your desired gauge. Use high-quality tools, clean regularly, and allow time for healing between sizes to ensure a safe, pain-free experience.
4.1 Preparing for Your First Stretch
Before stretching, ensure your piercing is fully healed. Clean your hands and ear with soap and water. Use jojoba oil to lubricate the area for a smoother process. Start with a size slightly larger than your current gauge to avoid discomfort. Choose the right tools, such as a taper or plug, and consider downsizing temporarily to maintain elasticity. Take your time and proceed gently to minimize risk and promote even healing.
4.2 Using Tapers for Stretching
Using tapers is a common method for ear stretching. Start by cleaning your hands and ear with soap and water. Apply a small amount of jojoba oil to the earlobe for lubrication. Insert the taper slowly and gently, ensuring it aligns with the existing piercing. Use one size at a time, allowing time for the skin to adjust. Avoid forcing the taper, as this can cause discomfort or injury. Proper aftercare is essential to promote healing and prevent complications.
4.3 How to Stretch Safely and Pain-Free
To stretch safely and pain-free, start with clean hands and ears. Use jojoba oil to lubricate the area, ensuring minimal discomfort. Insert the taper slowly and gently, avoiding force. Allow time for the skin to adjust between sizes. Never rush the process, as this can cause injury or uneven healing. Listen to your body and stop if pain occurs. Proper aftercare, including regular cleaning, is essential to promote healing and maintain healthy, evenly stretched ears.

Materials and Tools
High-quality materials like glass, steel, and wood are essential for plugs and gauges. Use tapers, oils, and aftercare solutions to ensure safe and effective stretching. Proper tools promote healing, durability, and style, making your ear-stretching journey successful and visually appealing.
5.1 Types of Plugs and Gauges
Plugs and gauges come in various materials, including glass, stainless steel, wood, and stone. Glass plugs are popular for their aesthetic appeal and comfort. Steel gauges are durable and ideal for long-term wear. Wooden plugs offer a natural look, while stone options provide uniqueness. Designs range from solid colors to intricate patterns. Gauges are measured in millimeters or inches, with sizes like 16g, 14g, and 00g. Plugs can be flared, screw-on, or single-flange, catering to different preferences and ear sizes.
5.2 Importance of High-Quality Materials
Using high-quality materials is crucial for safe ear stretching. Opt for biocompatible options like glass, stainless steel, or titanium, as they minimize irritation and infection risks. Avoid low-quality plastics or metals, which can cause allergic reactions. Durable materials ensure the plug stays secure, preventing uneven healing. Jojoba oil and sterile tools are recommended for stretching to maintain hygiene. Investing in reputable brands ensures comfort and reduces complications, promoting a smooth healing process and long-term ear health.
5.3 Essential Tools for Stretching
The right tools are vital for a safe and effective stretching process. Tapers, available in various sizes, are the primary tool for gradually enlarging piercings. Lubricants like jojoba oil reduce friction and discomfort. High-quality plugs or gauges ensure proper fit and comfort post-stretch. Sterile gloves and cleaning solutions are essential for maintaining hygiene. A stretching kit often includes everything needed, but purchasing individual tools from reputable sources ensures safety and reliability, making the process smoother and less risky.

Aftercare and Maintenance
Proper aftercare ensures healthy healing and prevents complications. Clean stretched ears daily with saline solution, avoid tight clothing, and massage with jojoba oil to promote elasticity. Be patient, as healing times vary, and avoid irritants to maintain ear health and comfort during the stretching process.
6.1 Cleaning and Hygiene Practices
Proper cleaning is crucial for healthy healing. Use a saline solution (1/4 teaspoon of sea salt in 8 oz of warm water) to gently clean your stretched ears twice daily. Avoid harsh chemicals or alcohol, as they can irritate the skin. Wash your hands before touching your ears to prevent infections. Pat dry with a clean towel, and avoid submerging your ears in water until fully healed. Regular cleaning helps maintain hygiene and promotes even healing.
6.2 Healing Time and Stages
The healing process varies from a few months to over a year, depending on aftercare and size increases. Initial stages involve redness and swelling, while later stages focus on internal healing. Proper aftercare ensures even healing. Patience is key to avoid complications like blowouts or infections. Healing times differ for each individual, but consistent care promotes healthy results. Avoid rushing the process to ensure your ears heal properly and maintain their desired appearance.
6.3 Common Mistakes to Avoid
Avoid rushing the stretching process, as this can cause blowouts or uneven healing. Skipping proper aftercare, such as cleaning and using the right oils, can lead to infections. Using low-quality materials or improper tools increases the risk of complications. Overstretching without allowing adequate healing time between sizes is a common error. Neglecting to downsize when needed can also hinder the healing process. These mistakes can delay results or cause permanent damage, emphasizing the importance of patience and careful adherence to best practices.
Common Complications and Solutions
Common complications include blowouts, infections, and uneven healing. Solutions involve avoiding over-stretching, maintaining hygiene, using saline soaks, and consulting professionals for severe issues to ensure proper recovery.
7.1 Blowouts and How to Prevent Them
A blowout occurs when the skin inside the piercing is forced outward too quickly, causing a visible bulge or tear. To prevent blowouts, stretch gradually, allowing each size to heal fully before increasing. Avoid using excessive force or skipping sizes. Clean the area regularly and use high-quality tools. Patience is key; rushing the process can lead to irreversible damage. Monitoring for signs of stress, like redness or swelling, can help address issues early.
7.2 Dealing with Infections
Infections during ear stretching can occur if proper hygiene practices are neglected. Signs include redness, swelling, warmth, or discharge around the piercing. To address infections, clean the area with saline solution and avoid harsh chemicals. If symptoms persist, consult a healthcare professional for antibiotics or further treatment. Prevent infections by using sterile tools and high-quality jewelry. Early intervention is crucial to avoid complications and ensure proper healing.
7.3 Tips for Even Healing
For even healing, maintain consistent aftercare routines, such as regular saline soaks and avoiding tight clothing. Rotate jewelry gently to prevent uneven pressure. Ensure both ears are stretched equally and avoid over-stretching, which can lead to blowouts. Keep the area moisturized with jojoba oil to promote elasticity. Patience is key; allow ample time between stretches to let tissues recover fully. Proper alignment and avoiding heavy jewelry during healing stages also contribute to a balanced, even result.

Advanced Stretching Techniques
Explore expert methods like dead stretching and tapering for larger sizes. Learn to achieve even results and maintain elasticity while minimizing risks of complications or uneven healing.
8.1 Dead Stretching vs. Taper Stretching
Dead stretching involves inserting a plug directly without a taper, relying on the ear’s existing elasticity. Taper stretching uses a tapered tool to gradually enlarge the piercing. Dead stretching is faster but riskier, requiring precise sizing and lubrication to avoid damage. Taper stretching is slower and often safer, allowing for controlled progression. Both methods demand patience. Dead stretching suits experienced individuals, while tapers are ideal for newbies; Proper technique and high-quality materials are crucial for either method to ensure safe, effective results and minimize complications like blowouts or uneven healing.
8.2 How to Achieve Larger Sizes Safely
To safely achieve larger ear sizes, gradual progression is key. Always wait for full healing between stretches, typically 6-12 months. Use high-quality tapers or plugs, and lubricate with jojoba oil to minimize discomfort. Start with small increments, such as one gauge size at a time, to avoid tearing or blowouts. Avoid rushing the process, as patience ensures even healing. Proper aftercare, including cleaning and maintaining hydration, supports skin elasticity and promotes safe enlargement. Prioritize your body’s signals to achieve desired results without compromising health or aesthetics.
8.3 Downsizing and Maintaining Size
Downsizing your ear size requires careful planning to avoid complications. Start by inserting a smaller gauge plug gradually, allowing the tissue to adjust. Use high-quality, biocompatible materials to minimize irritation. Regularly clean the area to prevent infections. If downsizing significantly, consider professional assistance to ensure safety. Maintenance involves consistent aftercare and monitoring for any signs of stress or tearing. Patience is crucial, as the process can take time and may require temporary downsizing to achieve long-term stability and desired aesthetics without causing permanent damage.

Style and Fashion
Stretched ears offer a canvas for self-expression, with various plug styles, materials, and sizes to complement personal aesthetics. Explore gauges, designs, and trends to enhance your look seamlessly.
9.1 Choosing the Right Jewelry for Your Size
Selecting the right jewelry for your stretched ears is crucial for both style and comfort. Consider the material, such as glass, wood, or metal, ensuring it suits your lifestyle. The size of the jewelry should match your ear gauge precisely to avoid discomfort or damage. For smaller gauges, delicate designs work well, while larger sizes can accommodate bold, statement pieces. Always prioritize high-quality materials to promote healing and maintain the health of your stretched lobes.
9.2 Popular Styles for Stretched Ears
Stretched ears offer versatility in styling, with various jewelry options available. Plugs and tunnels remain the most popular choices, often featuring decorative fronts or solid designs. Spirals and hangers add a dynamic look, while earlets provide a minimalist aesthetic. For larger gauges, ornate plugs with intricate details or natural materials like wood and stone are favored. These styles allow individuals to express their personal flair, making stretched ears a unique form of self-expression and fashion statement.
9.3 How to Accessorize with Stretched Ears
Accessorizing with stretched ears allows for creative expression. Pair bold plugs or tunnels with minimalist necklaces or bracelets for a balanced look. Opt for complementary colors or textures to enhance your style. Consider your personal aesthetic—bold statement pieces for edgy vibes or delicate designs for a subtler appearance. Mixing materials like surgical steel, glass, or wood adds versatility. Ensure accessories proportionally match your ear gauge size for a cohesive look. This approach lets your stretched ears stand out while harmonizing with your overall style.
Troubleshooting
Troubleshooting common ear stretching issues involves addressing pain, swelling, or uneven healing. Ensure proper aftercare, avoid over-stretching, and seek professional help if infections or blowouts occur to prevent further damage.
10.1 What to Do If It Hurts
If ear stretching causes discomfort or pain, stop immediately. Apply a cold compress to reduce swelling and clean the area with saline solution. Consider downsizing to relieve tension. Ensure proper aftercare and consult a professional if pain persists, as infections or improper technique may be the cause. Avoid rushing the process, as patience is key to safe and successful stretching.
10.2 Signs of Proper Healing
Proper healing is indicated by the absence of pain, redness, or discharge. The earlobe should appear normal in color and texture, with no swelling or inflammation. The piercing should be clean, and jewelry should move freely without resistance. Healing stages progress gradually, and consistent aftercare ensures a smooth recovery. If these signs are present, it confirms that the stretching process is proceeding successfully and the ear is healing as expected.
10.3 When to Seek Professional Help
Seek professional help if you experience severe pain, swelling, redness, or discharge, as these may indicate an infection. If you notice uneven healing, jewelry misalignment, or a blowout, consult a professional piercer. Persistent discomfort or signs of complications, such as excessive scar tissue, require immediate attention. A professional can address issues effectively, preventing further damage and ensuring proper healing. Don’t hesitate to reach out if you’re unsure about your ear’s condition or the stretching process;

FAQs
- Can I stretch my ears at home? Yes, but ensure proper hygiene and tools to avoid complications.
- How long does healing take? Typically weeks to months, depending on size and aftercare.
- Can I stretch both ears at once? Yes, but monitor each ear’s progress to avoid uneven healing.
11.1 Can I Stretch My Ears at Home?
Yes, you can stretch your ears at home, but it requires proper preparation and tools. Start with clean hands and use jojoba oil to lubricate the area. Use a taper or stretching kit to gradually increase size, ensuring no force or pain. Avoid rushing, as this can cause injury or uneven results. While home stretching is common, some prefer professional help for safety and precision. Always prioritize hygiene and patience to achieve desired results without complications.
11.2 How Long Does It Take to Heal?
Healing time varies depending on the individual and the size stretched. Initial healing typically takes 2-6 months, but full recovery can take up to a year or more, especially for larger gauges. Proper aftercare, including regular cleaning and avoiding tight jewelry, is crucial. Factors like starting size, stretching method, and personal health also influence healing speed. Patience is key, as rushing can lead to complications. Consistent care ensures a smooth and healthy healing process for your stretched ears.
11.3 Can I Stretch Both Ears at the Same Time?
Yes, you can stretch both ears simultaneously, but it requires careful attention to symmetry and aftercare. Stretching both ears at once can complicate healing, as each ear may heal at a different rate. It’s essential to clean both ears thoroughly and monitor their progress. Starting with one ear is often recommended for beginners to avoid overwhelming the healing process. If you choose to stretch both, ensure consistent care to maintain even healing and prevent complications.
Ear stretching requires patience, dedication, and proper care. With the right techniques and tools, you can safely achieve your desired size while maintaining healthy, attractive results.
12.1 Final Tips for Successful Ear Stretching
Successful ear stretching requires patience and dedication. Always allow adequate time between stretches to ensure proper healing. Use high-quality tapers and plugs to minimize risks. Keep jewelry clean and hygienic to prevent infections. Avoid over-stretching, as this can lead to irreversible damage. Start small and gradually increase sizes to achieve your desired look. By following these guidelines and maintaining consistency, you can enjoy healthy, stylish, and safely stretched ears for years to come.
12.2 Encouragement for Newbies
Starting your ear-stretching journey can feel daunting, but remember, it’s a rewarding process. Begin with smaller gauges and take it slow—your ears will thank you. Research thoroughly and invest in quality tools to ensure safety. Don’t rush; patience is key to avoiding complications. Listen to your body and celebrate small milestones. You’re part of a supportive community, so embrace the journey and enjoy the unique style that comes with stretched ears. With care and time, you’ll achieve your desired look confidently.
12.3 The Importance of Patience and Care
Patience and care are crucial for successful ear stretching. Rushing the process can lead to complications like blowouts or infections, which set back progress. Always allow adequate healing time between stretches and prioritize proper hygiene. Using high-quality tools and jewelry ensures comfort and safety. By being mindful of your body’s signals and taking a gradual approach, you’ll achieve your desired size without damage. Consistent aftercare and attention to detail will help maintain healthy, evenly healed lobes for years to come.